Stamp collecting is a rewarding hobby that involves both the thrill of finding rare pieces and the careful preservation of those treasures. One of the most important aspects of maintaining a stamp collection is how to mount stamps in an album. Properly mounting your stamps ensures they stay in pristine condition, retain their value, and are safely displayed for future enjoyment. However, improper mounting can lead to costly errors, including damage or loss of value.
In this article, we will guide you through the process of how to mount stamps in an album, discuss the essential tools and techniques you need, and highlight common mistakes to avoid. By following these tips, you can preserve the integrity of your collection and enjoy it for years to come.
Why Proper Mounting Matters
Before diving into how to mount stamps in an album, it’s essential to understand why the process is so critical. Stamps are delicate items that can easily be damaged by improper handling, humidity, or incorrect storage. When you mount stamps in an album correctly, you protect them from:
- Physical Damage: The adhesive used to attach stamps can cause tearing, bending, or fading over time if not done properly.
- Environmental Factors: Stamps can be exposed to light, dust, and moisture, which can degrade their condition.
- Decreased Value: A damaged stamp may lose its value, especially if it’s rare or part of a limited-edition collection.
Properly mounting stamps will ensure that they remain in the best condition possible, preserving their aesthetic appeal and collectible value.
How to Mount Stamps in an Album: Essential Materials
To begin learning how to mount stamps in an album, you’ll need to gather a few essential materials:
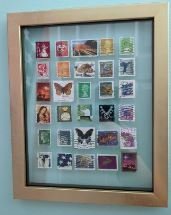
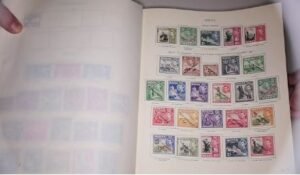
- Stamp Album: Choose a high-quality stamp album made specifically for philatelic storage. Look for one with acid-free pages, which help prevent the yellowing and degradation of stamps over time. Albums with clear pockets or mounts are ideal, as they provide visibility while offering protection.
- Stamp Mounts: These are clear plastic or glassine mounts that hold the stamps securely in place without causing damage. They are designed to prevent the stamps from sticking to the page, allowing you to remove or rearrange them without risking damage. There are different types of mounts, such as self-adhesive or hinged, so you can select the ones that suit your collection.
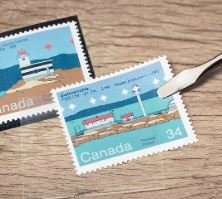
- Tweezers: Use a pair of non-metallic tweezers to handle stamps carefully. Metal tweezers can scratch or dent your stamps, so opt for plastic or soft-tip tweezers to ensure you don’t damage the edges.
- Mounting Paper: In some cases, you may need backing paper to mount your stamps. The paper should be acid-free and sturdy enough to support the stamp without bending.
- Stamp Cleaning Supplies: If your stamps are dusty or have any residues on them, use a soft, dry brush or specialized stamp cleaning cloth to remove any dirt before mounting.
- Magnifying Glass: A magnifying glass can help you closely inspect the condition of your stamps before mounting. It also helps when positioning the stamps accurately in the mounts.

How to Mount Stamps in an Album: Step-by-Step Process
Once you have all your materials, it’s time to learn how to mount stamps in an album. Follow these steps to ensure your stamps are mounted correctly and safely:
Step 1: Prepare the Stamp
Before you begin mounting stamps in an album, make sure your stamp is clean and in the best possible condition. Handle your stamps carefully to avoid getting oils or dirt from your fingers on them. Use your tweezers to gently pick up the stamp by its edges. Never touch the face of the stamp, as this can cause fingerprints, smudges, or damage.
If needed, use a soft brush to gently remove any dirt or debris from the surface of the stamp. If the stamp is particularly dirty, you can lightly clean it with a special stamp cleaning cloth but be cautious to avoid over-cleaning, as this can affect the value of older stamps.
Step 2: Select the Right Mount
Next, you need to choose the appropriate stamp mount for the stamp you’re mounting. Stamp mounts come in various sizes, so ensure that you pick a mount that fits the dimensions of the stamp comfortably without excess space. A mount that’s too small may damage the stamp, while one that’s too large might look untidy in your album.
For most stamps, clear plastic mounts work best, as they offer protection without obscuring the details of the stamp. Some collectors prefer hinged mounts, which allow stamps to be removed and replaced without much effort.
Step 3: Attach the Stamp to the Mount
Place the stamp face-up on the mount. If you’re using a self-adhesive mount, gently peel off the backing and press the stamp carefully onto the adhesive surface. Make sure the stamp is centered in the mount and that the edges are not folded or creased.
If you’re using a hinged mount, follow the same procedure by placing the stamp inside the mount and affixing it with a small adhesive hinge that will allow you to lift the mount and view the stamp without removing it.
Step 4: Position the Mount in the Album
Once you’ve mounted the stamp, place the mount in the album. Align it with the pre-designated slots or spaces within the album page. If the page has plastic pockets, slide the mount into the pocket. If you’re using a blank page, gently place the mount where it will be positioned and carefully press it in place.
Ensure that the stamp is not tilted or displaced and that there’s no unnecessary space around the stamp, as it can move and become damaged. Double-check that the album page is free from dust or dirt, which can detract from the appearance of your collection.
Common Mistakes to Avoid When Mounting Stamps in an Album
While learning how to mount stamps in an album is fairly straightforward, there are a few common mistakes to avoid:
- Using Incorrect Adhesives: Never use regular glue, tape, or any other adhesive that could damage your stamps. Always use stamp mounts designed for philatelic purposes, as they are safe and won’t cause harm.
- Mounting Stamps on the Album Pages Directly: Directly mounting stamps onto the album pages with glue or tape can cause long-term damage. Always use clear mounts or pockets for better preservation.
- Overhandling Stamps: Handling stamps too much can cause wear and tear. Always use tweezers and avoid touching the face of the stamp with your fingers.
- Improper Storage: Storing your stamps in a humid or sunlight-exposed area can cause fading or mold growth. Make sure your album is stored in a cool, dry, and dark place to preserve your collection.
- Using Too Much Pressure: When placing the stamp in the mount, don’t apply excessive pressure, as this can bend or distort the stamp. Handle with care and precision.
Conclusion
Mastering how to mount stamps in an album is essential for any serious stamp collector. By using the right materials, following a step-by-step mounting process, and avoiding common mistakes, you can ensure that your stamps are well-preserved and their value is maintained. Whether you are new to stamp collecting or an experienced philatelist, the proper mounting of your collection will keep it safe for years to come.
Remember, the goal is to protect your stamps while showcasing them beautifully. By following the techniques outlined in this guide, you will be able to mount your stamps securely and avoid the costly errors that come with improper care. Keep your collection in top shape, and enjoy the process of watching it grow!