
Stamp collecting, or philately, is a fascinating hobby that blends history, art, and personal interest. Whether you’re a seasoned collector or just starting, showcasing your collection in a meaningful way is an essential part of the journey. However, the question remains: how to create a stamp display that is not only visually stunning but also protective of your valuable stamps? Is it a fun and rewarding project, or does it present a frustrating challenge that requires a lot of trial and error?
In this article, we’ll explore the process of how to create a stamp display, examining the steps you should take, the potential pitfalls, and how you can make it an enjoyable and fulfilling experience. By the end, you’ll be better prepared to decide if creating the perfect display is a creative pursuit worth your time—or a daunting task you might want to reconsider.
Why You Should Create a Stamp Display
Before diving into the “how-to,” it’s important to understand why to create a stamp display in the first place. A well-organized, visually appealing stamp display offers several benefits:
- Showcases Your Collection: A display allows you to exhibit your hard-earned stamps in a way that does justice to their beauty, rarity, and historical significance. It also provides an opportunity to share your passion with others, whether they’re fellow collectors or visitors.
- Preserve Stamps: Properly displayed stamps can be protected from environmental factors that could cause deterioration, such as direct sunlight, moisture, or physical damage. A good display also helps organize your stamps, making it easier to appreciate the collection as a whole.
- Personal Satisfaction: Creating a stamp display can be a rewarding process that allows you to express your personal style. It’s an opportunity to be creative, experiment with layout, and bring your unique perspective into your collection.
Now, let’s delve into how to create a stamp display that balances the rewarding aspects with the challenges that might arise.
Step 1: Decide the Type of Display
The first step in how to create a stamp display is deciding what kind of display suits your collection and your space. There are several options available, and each comes with its own set of pros and cons.
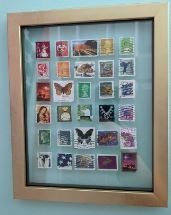
1. Framing Your Stamps
One of the most traditional ways to display stamps is by framing them. Framing is simple, elegant, and can instantly enhance the appearance of any stamp collection. However, this method may not be ideal for every collector. Framed stamps are often fixed in place, which means they can’t be easily re-arranged. Additionally, sunlight can cause fading over time, and frames may not provide the same level of protection against dust or humidity as other options.
Pros:
- Easy to set up
- Elegant presentation
- Good for showcasing particularly rare or aesthetically appealing stamps
Cons:
- Limited flexibility (difficult to change layout)
- Less protection from environmental damage
2. Stamp Albums
Another popular option is using stamp albums to display your collection. Albums offer protection and organization while also making it easy to view and appreciate your stamps. With albums, you can easily arrange stamps by series, country, or theme. However, they can be cumbersome if you have a large collection, and if the album is not properly stored, there’s a risk of bending, tearing, or fading.
Pros:
- Easy to add or remove stamps
- Offers good protection if stored correctly
Cons:
- Might lack the “showcase” feel of a framed display
- Larger collections can quickly become bulky
3. Shadow Boxes and Display Cases
For collectors who want a balance of protection and visibility, shadow boxes or display cases are an excellent option. These containers offer a protective, enclosed space where your stamps can be organized and viewed without exposure to the elements. Display cases come in various sizes and can be placed on a wall or displayed on a table.
Pros:
- Offers full protection
- Visually appealing with a three-dimensional effect
- Easy to organize and rearrange
Cons:
- Can be more expensive
- Requires space for display
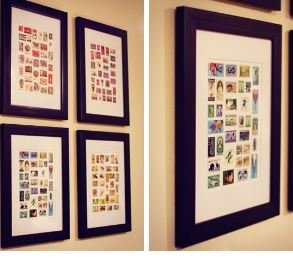
4. Creative DIY Displays
For those who want something unique, creating a DIY stamp display is a fun and creative way to show off your collection. You can use materials like corkboards, wooden frames, or even map backgrounds to create a custom display. This option allows you to personalize your display to reflect your style but can be challenging if you’re not experienced with crafting.
Pros:
- Highly customizable
- Budget-friendly if you use simple materials
Cons:
- Time-consuming
- Requires some crafting skills
Step 2: Plan Your Layout
Once you’ve chosen your display type, how to create a stamp display that is aesthetically pleasing requires careful planning. A good layout not only enhances the visual appeal but also helps protect the stamps by avoiding overcrowding.
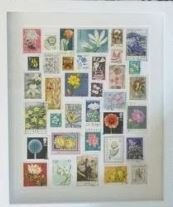
- Grouping by Themes: If your collection has a specific theme—such as animals, historical events, or famous personalities—consider organizing your stamps accordingly. This creates a cohesive look and makes the display more visually engaging.
- Grouping by Value or Rarity: You might also want to display your most valuable or rare stamps in a prominent position. This ensures they get the attention they deserve while also safeguarding their condition by placing them in protective sleeves or frames.
- Use of Space: Ensure there’s enough space around each stamp for proper viewing. Overcrowding your stamps can make the display look chaotic and detract from the beauty of individual pieces.
Common Layout Pitfalls
As you plan your display, consider some potential challenges. How to create a stamp display that avoids these pitfalls is essential to achieving a polished final result:
- Avoid Overcrowding: Packing too many stamps into a small space can make it difficult for viewers to appreciate the details.
- Uneven Spacing: Random spacing can make the display appear chaotic. Try to align stamps evenly to give the display a clean, organized look.
- Improper Mounting: If your stamps aren’t mounted securely, they may slide or fall out of place, making your display look sloppy. Ensure each stamp is securely fixed in place.
Step 3: Choose the Right Materials
The materials you use will significantly affect both the protection and aesthetic of your stamp display. Here’s what to consider when selecting materials for your display:
- Stamp Mounts and Hinges: These are used to hold stamps in place without damaging them. Stamp mounts (clear plastic sleeves) are a popular choice as they protect while allowing you to see both sides of the stamp.
- Acid-Free Materials: To prevent deterioration from acid or moisture, always use acid-free backing boards, frames, and albums. Non-acidic materials are essential to keep your stamps in the best possible condition over time.
- Glass or Acrylic Covers: If using a frame or display case, opt for glass or acrylic with UV protection to prevent fading from sunlight exposure.
- Display Frames: If framing your stamps, make sure the frames are made of durable materials and provide a sealed, airtight environment to protect against dust and environmental factors.
Step 4: Mounting and Arranging the Stamps
Now comes the fun part: creating the stamp display by mounting your stamps and arranging them according to your chosen layout. If you’re framing your stamps, carefully position them in the frame with acid-free mounting corners or adhesive strips. If you’re using an album, make sure each stamp is securely placed in its designated slot to prevent shifting.
Remember, when creating a stamp display, it’s essential to handle your stamps with care. Use tweezers to avoid touching the stamp with your fingers, as oils and dirt can damage the surface over time.
Step 5: Maintain and Protect Your Display
The final step in how to create a stamp display is ensuring that it’s protected and preserved for years to come. Regularly check the display for any signs of damage or fading. Keep your display in a cool, dry place, and away from direct sunlight. Additionally, ensure that the humidity levels in the room are controlled, as too much moisture can lead to mold or mildew.
Before delving into whether understanding stamp color variations is helpful or daunting, it’s essential to define what these variations are and how they come about. In short, stamp color variations refer to the differences in the ink colors used during the printing process that result in stamps appearing in different shades or hues.
Conclusion: A Fun and Rewarding Project or a Frustrating Challenge?
Ultimately, how to create a stamp display is both a fun and rewarding project, but it can also present some challenges. If you approach the task with patience, creativity, and a bit of planning, you’ll find that creating a beautiful, organized stamp display is a highly fulfilling part of stamp collecting. However, it’s not without its frustrations—choosing the right materials, carefully mounting each stamp, and avoiding potential mistakes can take time and effort.


